The number one mistake
As a printing shop, we've printed lots of photos from our customes. The number one issue is the uploaded images are too dark, especially the ones taken on mobile phone cameras. In this short article, we will show you how to use SnapSeed's Brightness Control feature to instaneously improve the quality of your final prints.
Here is a first-day-in-school photo I took for my friend Rimu. The light wasn't great and I shot it with my iPhone 6. As you can see, there is a significant improvement in the skin colour after a slight brightness change.

Histogram is your friend
Don't be scared by the term "histogram". It's one of the secret weapons that every professional photographer use on daily basis. It's very easy to understand and once you know what it means, you will find it much easier to identify potential quality issues.
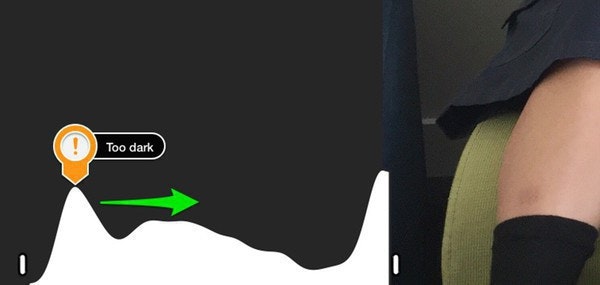
Let's zoom in and take a closer look.

Histogram shows the brightness of the different parts in a photo. The graph on the left means the contents might be too dark and you want to brighten it up by moving the curve to the right. The contents on the right means the details are probably too bright and making them slightly darker will bring out more details.
Generally speaking, when you edit your photo, your goal is to make the curve distribute evenly in the histogram.

Video instructions
This blog post is part of the free Photo Editing for Busy Parents course, where we help you make the most of your family photos. Each class covers one single topic that takes only 30 seconds to learn, even if you have no previous experiences with photo editing techniques.
<div class="chapter col-xs-12 col-sm-6">
    <a href="/blog/help-my-photo-prints-too-dark.html">
        <small class="chapter-number">Lesson 1</small>
        How to Brighten Up Your Photos
    </a>
</div>

<div class="chapter col-xs-12 col-sm-6">
    <a href="/blog/how-to-remove-shadows-from-face.html">
        <small class="chapter-number">Lesson 2</small>
        How to Remove Shadows from Faces
    </a>
</div>

<div class="chapter col-xs-12 col-sm-6">
    <a href="/blog/soften-high-contrast-statue-using-snapseed-ambiance.html">
        <small class="chapter-number">Lesson 3</small>
        How to Soften High Contrast Photos
    </a>
</div>
<div class="chapter col-xs-12 col-sm-6">
    <a href="/blog/how-to-use-snapseed-hdr-scape-to-enhance-your-landscape-photo.html">
        <small class="chapter-number">Lesson 4</small>
        How to Enhance Your Landscape Photos
    </a>
</div>