Why should you do soft proofing and what do you need?
How to calibrate your monitor
ICC printer profiles
Setting up for soft proofing in Adobe Lightroom
Setting up for soft proofing in Adobe Photoshop
How to interpret the soft proof
Why should you do soft proofing and what do you need?
There is nothing worse than spending hours editing a photo on your computer until it looks exactly the way you want, only to print it out and find the physical print is nothing like what you saw on screen. The goal of soft proofing is to ensure you end up with a print that matches what you see on screen as closely as possible. This article provides all the information you'll need for soft proofing. If you want precise control over the the final prints, please contact us and we'll be more than happy to work with you to produce physical proofs for your work.
There are three things you need for soft proofing:
A calibrated monitor
ICC Printer profiles
Colour managed photo editing software - in this article we provide instructions for soft proofing in Adobe Lightroom and Photoshop
How to calibrate your monitor
Before starting the soft proofing process, you may want to double check that your monitor is calibrated and profiled correctly. 80% of the proofing issues come from incorrectly calibrated screens. The aim of calibrating your monitor is to ensure that the colours you see on screen are the colours that are in your image file. Adobe has a short guide on how to calibrate and profile your monitor. For a more detailed discussion, we recommend this 6-page PDF document from x-rite, the manufacturer of monitor calibration hardware.
A simple way to calibrate your monitor is to use calibration software - in Windows and MacOS there are built-in tools that you can use. Just find the tools listed below and follow the onscreen prompts to calibrate your monitor and create a new ICC monitor profile.
Microsoft Windows 10 - use the Windows search bar to search for the Calibrate Colour Display app
MacOS - use the Display Calibrator Assistant which is located in the system preferences under the Displays tab
If you are more serious about your soft proofing, you might like to purchase some monitor calibration hardware, such as one of the products from x-rite
Note: we are not affiliated in any way with x-rite.
ICC printer profiles
The next step is to make sure you have the appropriate ICC printer profiles installed on your computer. These are specific to the paper and printer combination that you are intending to use and will enable you to do your soft proofing. We provide the following ICC profiles which you can download and install:
To install the ICC profiles, download them into the system colour profiles folder:
In Windows - WINDOWS\system32\spool\drivers\color
In MacOS - /Library/ColorSync/Profiles
Note: after installing the ICC profiles, be sure to restart your photo editing software.
Setting up for soft proofing in Adobe Lightroom
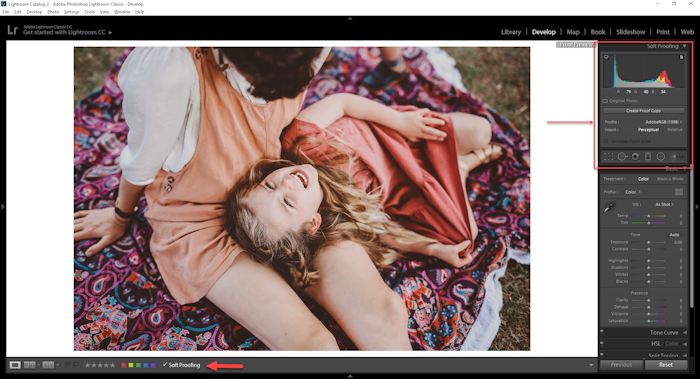
Open your image in the Develop module and click on the Soft Proofing check box at the bottom of the screen. This will open the Soft Proofing box in the toolbar.
Lightroom Step 1: Click on the Soft Proofing check box.
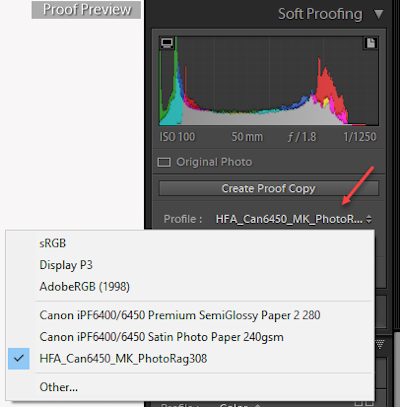
By default, Lightroom displays images using your monitor's profile. You can simulate what the photo will look like when printed by choosing the ICC printer profile (installed in the previous step) from the Profile menu.
Lightroom Step 2: Select the ICC profile to use.
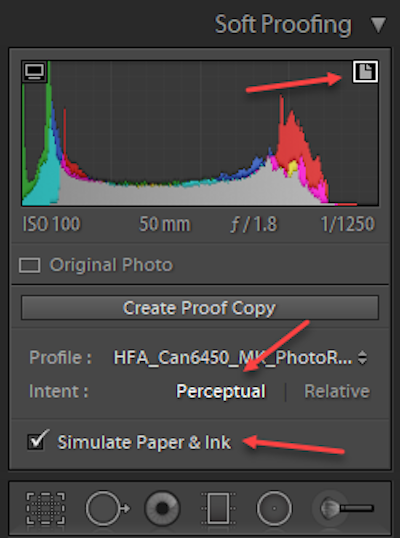
Once you have selected the profile of the output you intend to use, Lightroom will try to give the best representation on screen of how the photo will be printed using the printer/paper information from the ICC profile.
Before you continue, make sure you Show Destination Gamut Warnings, have Perceptual selected for the intent, and tick the box to Simulate Paper & Ink.
Lightroom Step 3: Show warnings.
Click Create Proof Copy, and Lightroom will create a virtual copy of the photo ready for soft proofing
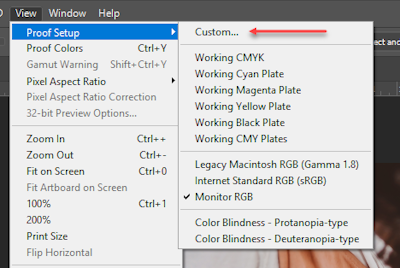
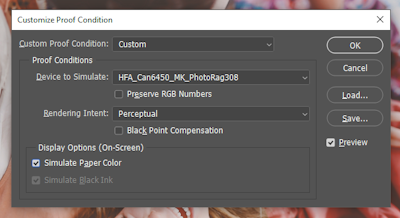
Open your image inside Photoshop and select View → Proof Setup → Custom...
Photoshop Step 1: View Proof Setup.
From the Customize Proof Condition dialog box, click on the Device to Simulate box and select the desired ICC profile from the list. Make sure Preserve RGB/CMYK Numbers is unchecked, Rendering Intent is set to Perceptual and Black Point Compensation and Simulate Paper Colour are unchecked. Click OK to accept the changes and apply the soft proofing profile.
Photoshop Step 2: Customise Proof Conditions.
From the View menu, select Proof Colors to view the soft proof of your photo.
So what does it all mean? Quite often when you apply the printer profile and the settings in the previous step your photo can appear different and it's hard to know what to do.
The main thing is that this soft proof is giving you an idea of how the photo is going to look when printed rather than displayed on screen. For example, you might find that if you have selected a mat paper stock the image looks a little washed out and you want to boost the contrast a bit, or you may find with a gloss paper stock the photo appears a bit over saturated and so you want to make a minor saturation/vibrance adjustment.
Ideally your wouldn't to do many alterations to the image, but rather use the soft proof as a guide to how the photo will look with the selected paper stock on the printer you are using. Again with the example of the mat paper stock, such as our Hahnemühle Photo Rag, you might decide that, after looking at the soft proof with the mat finish, your photo would look better on a gloss paper. In this case you would change the ICC profile to one of our gloss paper stocks, Archival Silk for example, and view your soft proof again.
Viewing a soft proof of edited photo using the ICC printer profile for Hahnemühle paper, and making a few minor tweaks to the editing before exporting from Lightroom.